Thursday, December 19, 2013
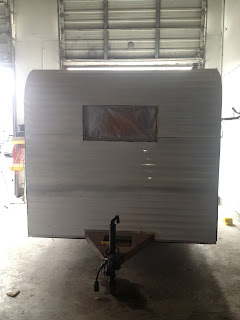
White Paint Done, Time For Red
Gotta get those curves right. It was pretty difficult but I think it will be worth it when its done. The auto body shop had to make several templates and then make them all even. I wanted a more feminine look than the more popular straight lines and z's.
The painter was asking me why I didn't want to paint the window frames the same colors. I chose to keep them aluminum after looking at many, many photos of both painted and aluminum. Besides saving a little money on paint, I chose to keep them aluminum in case I ever have to replace a window frame (ex. it gets broken into or they get dented or they start to leak & we would have to work on them) then I wont have to haul it back into the paint shop.
Monday, September 9, 2013
On Her Way To Paint
Bye Addison! See you in a few! First step is to fill all the old holes from previous owners additions of locks and things they had added thru the yrs. Then they'll sand them down and start the primer and paint.
Tuesday, August 27, 2013
Replacing Interior Of Door
One more step before she is whisked away to paint! We needed to play with the door. The wood was badly rotted and warped. Also the aluminum was bent out of shape at the bottom. We also bought a new locking mechanism for the original handle. I am toying with the popular idea of chalkboard painting the interior of the door. I guess future pictures will tell!
Finished door
The original and new wood
Door frame was in good shape, no structural damage.
Sunday, June 2, 2013
Interior Paint Time
UPDATE: I have since repainted her a warmer yellowish color from Home Depot called Calm Air. I know, I know, us woman usually know what we want right away (insert sarcasm) but I noticed everyone who didn't have wood veneers were painting them white & off white so I decided I needed to be different! I did keep the benches the Cottage White, however to match the future moldings.
New color:
See?! I work! Its not all Mike LOL. The primer is just soaking up my beautiful Cottage White which is the name of my color. I still want the trailer to look vintage/antique. Its not a new trailer and it won't be decorated modern so I didn't want too bright, eye popping white. This keeps it light & airy but still warm like many of the knitted pillows that will be used in the decorating. Coming up next...time for the molding for seams and corners to give it a finished look. Then we will replace windows & add window molding.
The white primer is from Home Depot and is also sandable. So when we filled the holes from the staples and nails then we primered the whole thing, sanded it, then repeated a couple more times. This made the walls very, very smooth with no blemishes. (Note: The wainscoting is going on the walls where wrap around table & benches will be, however in the kitchen I'm installing the tin for a backsplash so we just used the flat board for that, flat for the ceiling, and flat in area that will be in the closet.)
Wednesday, May 29, 2013
Some Hang Laundry On The Line...We Hang Windows
Hope the neighbors don't complain! Well, it only took 2 days. But we gave the original window frames a nice, hot, acid bath. They came real clean! All the oxidized black came right off. Then Mike sprayed some metal paint, color is aluminum, cleaned the glass, and they look great, nice & shiny!
Wednesday, May 15, 2013
Electrical is Done & Plastic is On!
All the electrical is finally finished. We added some new lighting spots and we're adding switches by the door. After all the wiring and boxes were done, we put the insulation we had already pre cut back in and then covered it all with the plastic sheeting that also adds as extra insulation. For not alot of $ it stops any wind from blowing in between anything, just in case.
Mike also installed the new vent for the refrigerator which is taking the place of the original ice box but we're keeping it in the same spot, above the counter next to the sink.
Mike also installed the new vent for the refrigerator which is taking the place of the original ice box but we're keeping it in the same spot, above the counter next to the sink.
Saturday, February 9, 2013
Tow Ready
A mobile welder came this week to weld on the front new tow and the rear bumper with the new license holder. If you remember in the before pics the hunter had huge boxes sitting on welded grates on the bumpers. I wanted a more original look.
The license holder is welded to a piece of metal that slides out when we want to add the bike rack to take our beach cruisers along!
The license holder is welded to a piece of metal that slides out when we want to add the bike rack to take our beach cruisers along!
Let There Be....Wiring!
No lights yet, but they're on their way! The wiring is almost complete and we kept the original box but used all new wiring. We're also putting a light where there wasn't one before, over the table and a couple reading lights on each side of the trailer. We will install 2 single bunks above so we figured if they were occupied we wouldn't have any light if we wanted to read on the king sized bed underneath.
In smaller trailers the front kitchen floor plan, like this Santa Fe, is just my personal favorite by comparison to the more popular side kitchens. With the kitchen in the front, it turns the rest of the unit into huge wrap around benches with table. Enough to seat 6 adults. But for bed time, the table will fold down to the bench heights and a great quality king sized blow up mattress sits right on top. When not in use the mattress is conveniently folded up & stored in closet or under one of the benches. I LOVE the bigger bed and the fact we can sleep together. (awwww)
In the side kitchens there is a dinette area up front which usually sleeps 1 adult and in the back there is usually a jack knife sofa that sleeps 1 1/2 adults, with the kitchen in the middle breaking up the 2 sections.
TIP: In searching for the best floor plan for yourself in a smaller sized trailer, consider what you will be using your trailer for the most. We actually camp in it, but we are more often going to car shows and car meets for the day in which we knew we would need to hang out and eat in it more often than actually sleeping so making up the bed every so often wouldn't be too much trouble. But having a huge table would be a great asset.
If however you only plan to use it for camping, you may like the idea of one person being able to still be asleep while the earlier riser wants to sit at the table and eat breakfast and read the paper. But prepare to sleep separately or tighter together in a smaller bed.
And in a teardrop, we managed to put a queen sized bed in by extending the axle and putting the wheels on the outside with fenders above like a car.(See the pics under my page "Past Glampers") Most vintage tears have the wheel wells on the inside which you need a smaller mattress or cut out the wells around the mattress in which you still have less space.
Just a few things to consider when shopping floor plans. :-)
Monday, January 14, 2013
Interior Walls
Oh wainscoting, how much do I love thee? Let me count the ways...I love the crisp, clean look of white. It also will make the small space seem a little bit bigger so I will be painting it white. But wainscoting can be painted ANY color which can put a custom look on your glamper. This trailer is being designed as a big wrap around dining area, it will not have a separate sofa, so the wainscoting to me suits a kitchen space. Also I thought since we have insulated the whole trailer, I didn't need to worry about using a nice grade wood. We also wanted to keep the weight down and this is thin and light. (I have noticed some trailers have beautiful wood still in place and if that were the case with this one, I would've kept it wood. But this Santa Fe had really bad looking 70's paneling which had water damage in alot of areas.)
At this stage we are cutting and marking. You don't want to screw it in place yet until you have made sure all your electrical is finished and all the insulation you want to add is in place. In our case, its not. So we are just pre cutting.
New Aluminum
And just like that, we have a perfect new front without a million dents and the cave in from the original owner's hunting box that he had mounted on the front.
Subscribe to:
Comments (Atom)

.JPG)
.JPG)


.jpg)
.jpeg)


.JPG)
.JPG)

.JPG)
.JPG)
.JPG)
.JPG)


